Sunday, June 28, 2009

Show Related Article to Your Post

The advantage of showing related article to your post is it will help your readers find more information related to the topics. This is base on label or category. This is usually put to the end of the article. After your visitors finish read your article, they will find some links that related to the post base on label or category.
Here's the tutorial to create "related article to your spot":

1. Login to Blogger
2. Go to "Layout-->Edit HTML"
3. Click on "Expand Widgets Template" checkbox.
4. Then download THIS SCRIPT or HERE.
5. Open it then copy the scripts.
6. Paste the script after this code : <data:post.body/>. If you have "Read more widget" you will find two codes. Put it under the first code.
7. Save your template.

Good Luck...


Wednesday, June 24, 2009

Submitting Blogger Sitemap to Google Webmaster Tool

Submitting XML sitemap to Google Webmaster Tool is a part of SEO (Search Engine Optimization) initiative.
Submitting your sitemap to Google Webmaster Tool is not a must-do job. It won't directly affecting your site's SERPs,
but it helps Google crawler to comprehend your site's structure and "read" your contents more deep and accurate.


Submitting sitemap is like you give to Google crawler a sight. Without sitemap, what Google crawler do is just like blind man trying to guess what elephant's body shape is, only by touching it. He may only found elephant's trunk and say that elephant body is "long and thick". Or he only touching elephant's left ear and then conclude that elephant body is "thin and wide". He never really know the exact shape of the elephant.

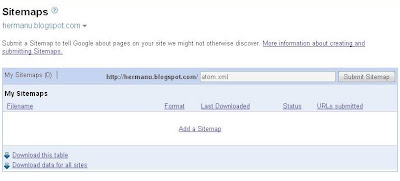
Submitting Blogger sitemap is very easy. You don't even need to generate any sitemap. Just use your blog's Atom or RSS feed as sitemap. Login to your Google Webmaster Tool. On its main panel, choose blog you want to add a sitemap (if you have more than one). Click on Sitemaps Fill the blank textarea next your blog's URL with "Atom.xml" or RSS.xml" like this:

Submitting Blogger Sitemap to Google Webmaster ToolThen click Submit Sitemaps

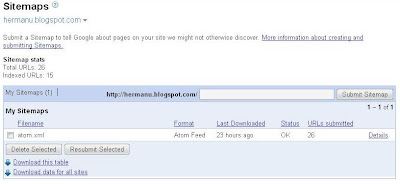
Once you submit your blog's Atom or RSS as sitemap, you can see its crawlability through Webmaster Tool Panel:

Submitting Blogger Sitemap to Google Webmaster Tool
Note: Only latest 26 blog posts is cover on Blogger Atom or RSS feed. If you have more than 26 posts, earlier posts won't appear on that feed. Don't worry, those posts is still on Google index. You only can't track them through Webmaster Tool.

Why My AdSense Revenue is Very Low?

"Why my AdSense revenue is very low" is a common question among small AdSense publishers and bloggers. For those who confused and frustated, here is both good news and bad news: You are NOT alone.

Your problem with AdSense revenue is very common. Perhaps 90 percent (or more) AdSense publishers celebrating their first anniversary joining Google AdSense program with only few dimes in their account, embarrasing enough even just to buy a can of pet food. But you won't hear any AdSense publisher's failure story on the web, because everybody tend to keep their secret and let other people think prosperity and wealth always be with him :-D So don't blame yourself!


Looking at those sadness point, you may start thinking AdSense is useless, or even guessing someone at the Googleplex has doing conspiracy and stole your balance ...

No. There's no conspiracy, monkey business, or account balance stealing. Nothing wrong with AdSense program. AdSense is the best ad-network you can find on the web so far. It offer big buck reward for everyone who deserve to receive it. It's true that Google hide some detail fact and all internal data about AdSense program publisher want to know - and also strictly prohibit AdSense publisher to publish their own data.

However, we should regard Google goodwill to share part of their wealth with site's owners and bloggers. Those Big-G will not hurt their own reputation just to stole your petty cash. They've got their own revenue from advertisements on above and right side of Google search result. Huge enough to pay more than 20,000 employees and make Larry Page and Sergey Brin - duo Google co-founder - two of richest people in the world.

So now we should start seeking and breaking the problem in ourselves - and our sites. What wrong with our sites? Here is three key factors who build up your AdSense revenue:

1. Traffic, traffic, traffic

No traffic, no click. No click, no revenue. No need Albert Einstein to understand this very simple logic. Site or blog which have less than 1,000 visitors per day tend to have more difficulties to gain feasible revenue, since there's no much clicks-through on your ads.

The basic formula of Google AdSense revenue is:

AdSense Revenue = (Impressions * CTR * CPC)

Ad Impressions is depend on site's traffic. How to increase traffic to your site is not this article's scope and focus. Follow Allan Gardyne tips on his free PDF ebook 77 ways to increase website traffic.

If you feel increasing traffic is hard and time consuming process, ad impressions can also be increased by doing some on-site tweaking, such as adding "Related articles" section below your post that make visitors will spend longer time staying on your site if they found other interesting articles.

Other tip is divide your long article into multiple short posts. This trick will bait visitors to open all posts to finish reading entire article. More visitors spend their time on your site, more chance they will click on your ads. It's just similar to "to be continued" trick applied on every ending on popular TV series or soap opera.

2. Click-Through Ratio (CTR)

How much of your visitors who really turn to be ad-clickers? Click-Through Ratio (CTR) is a parameter to measure this - as it name suggest. The simple picture about CTR is, if you have 1,000 visitors and CTR of 2, it mean 2% of those 1,000 visitors (= 20 visitors) clicks on your ads. On the other word it means one of every 50 visitors will be ad-clickers. CTR is important because a rise of 0.1 in CTR will increase your revenue as much as 10%.

So now you have a picture why 1,000 visitors (or impressions) per day is normal target to generate feasible AdSense revenue. If your site has only 20 visitors per day and CTR under 1, you will spending your entire life counting time until the next five cents-worth click happen ..

CTR is vary and highly influenced by on-page factors including ad placement, ad color, and ad unit style. If daily traffic amount is not your problem anymore, then you should give more attention to these factors. Official AdSense Publisher's Optimization Tips will help us by give any useful tips, such as blending ads with content (but not to make your visitors confuse to differentiate between content and AdSense ads), choosing best ad unit, best ad placement etc. Follow their guidelines and combine it with your own improvisation.

3. Cost-per-Click (CPC)

AdSense ads price are not created equal. Its worth based on Google AdWord dynamic bidding mechanism. Ads price has wide range from few cents to several dollars per click. We - as publisher - have a portion of this value. How much exactly no one knows. Except we are VIP or one of those big publishers with special contract, we have no power to insist Google to reveal their payment scheme.

However, we still can determine which keywords have high CPC by using Google AdWord Keyword Tool External to get rough estimation about how much you'll be paid if you optimizing your page using those keyword(s).

But always keep in mind, don't go too far with high paying keywords. You shouldn't 'prostitute' your site or blog solely to chase dollars from high paying keywords. Don't write about mesothelioma prognosis if you are not expert on this medical field, just because mesothelioma is one of most prosperous AdSense keyword. It can mislead people who seriousy seeking for those crucial medical information, and also can be black-listed as web spammer. Once your site identified as spam site, Google will penalize it from their index with no mercy at all.

Internet is full of junk, so don't throw up more dirts on it. If you're blogger, keep the purpose and reason of our blogging activity is because we enjoy it and want to enhance other people's experience. Treat AdSense just as candy reward because we provide best content for people - not as goal or motive that makes we start blogging. When we focus on quality and worthful content - and always make it up-to-date by adding new contents regularly, then traffic will automatically increase by the time. Both direct and via search engine. So do your AdSense revenue ..

Embedding Adsense Ads Within Blogger Post Body

Many AdSense publishers believe that embed AdSense ad inline or within post body will significantly increase CTR (Click Through Rate) - so the revenue. I agree with them, based on my own experience. Logically, ad within post body tend to have higher attention from visitors and decreasing what so called ad-blindness. You can see my medium-rectangle AdSense ad unit standing on right side of this text, blended with entire post.

If you have Blogger blog and want to put your AdSense ad on your post body just like mine, steps you should do is bloody easy to learn. First, generate AdSense code. I suggest you generate suitable ad unit like large-rectangle (336x280) or medium-rectangle (300x250) - depend on your main column width:


src="http://pagead2.googlesyndication.com/pagead/show_ads.js" type="text/javascript">


Next, parse your AdSense code. You cannot embed those code directly into your blog template without parsing it before by replacing some elements on those code. Don't worry, it won't infringe Google AdSense TOS because parsing is NOT an attempt to change the code. It only change the way computer interpret your code - not altering it. Basically parsed code is exactly same as original - before it parsed.

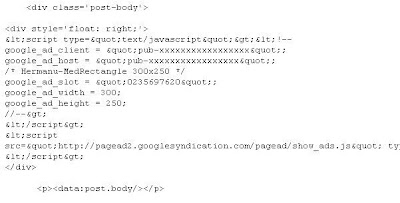
Replace three elements on those code as mention below:

Embedding Adsense Ads Within Blogger Post BodyYou don't have to replace it manually, one by one. Don't bother yourself! Use simple text editor like Notepad. Open Notepad, then click on Edit menu --> Replace. Replace window will come up. Fill in character you want to replace on Find What: input, and new character on Replace With: input, then click on Replace All button:

parsing AdSense ad
Those parsed code then should embed on your blog template. Open your Blogger HTML template editor, then click on "Expand widget template". Find this code on your Blogger HTML template:


If you want your Adsense ad appear on inline-above side of you post (like mine), put your AdSense code right above data:post.body code:

Embedding Adsense Ads Within Blogger Post Body
Don't forget to wrap your AdSense code between
to ensure your AdSense code blending perfectly with Blogger template. If you want your ad take a position on left side, just replace wrapper code div style='float: right;' with div style='float: left;'.

Additionally, if you want your AdSense ad appear below your post, put it right below

code. Try it, and always be careful of coding work. Because each single character is meaningful. If success, then buy me a beer :-)

Sunday, June 14, 2009

How to Install Google Analytics on Blogger

Google Analytics Blogger Logo

Wouldn’t it be nice to know how many people actually visited your blog each day? How about knowing which of your posts are the most popular? Well surprisingly Blogger doesn’t currently offer any native blog analytics but fortunately there is Google Analytics — available for free.


Google Analytics is a great tool that will show you all sorts of useful information about how people found your blog, keywords they searched on to find you, where they came from and even how long they stayed. You’ll learn more about where your visitors come from and how they interact with your blog. This is a must tool if you are trying to build a profitable blog otherwise you are flying blind!

This article will show you how to add Google Analytics to your Blogger blog. It’s a fairly simple process and doesn’t require any technical skill at all.

Step #1 - Setup a Google Analytics Account

Go to Google Analytics and sign in using your Blogger login. If your account doesn’t work for some reason, you can create a new one instead. Once you login you’ll see a screen that looks like this:

Google Analytics Blogger Sign Up Step 1

Click on the “Sign Up >>” button and proceed to the next step which will ask you for your general information. Website URL, Account Name, Country, and Time Zone. The screen will look like this:
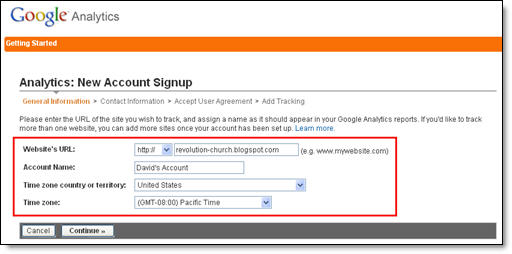
Google Analytics Blogger Step 2

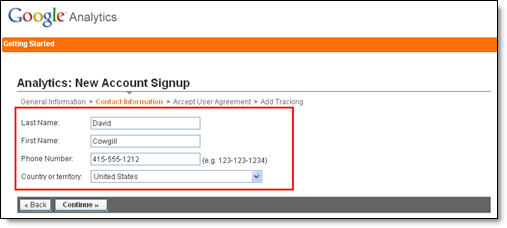
If you noticed, I just put my Blogger url (without the http://) and called it “David’s Account” because this is your top-level container for 1 or 100 different websites so it’s a good idea to name it something more general. The next step will ask you for your contact information which includes your first name, last name, phone number, and country. Easy so far right? :-)

Google Analytics Blogger Step 3

Your last step in signing up will ask you to accept the user agreement terms and conditions which you should read (just kidding…who actually ever reads these entire legal terms anyhow?).
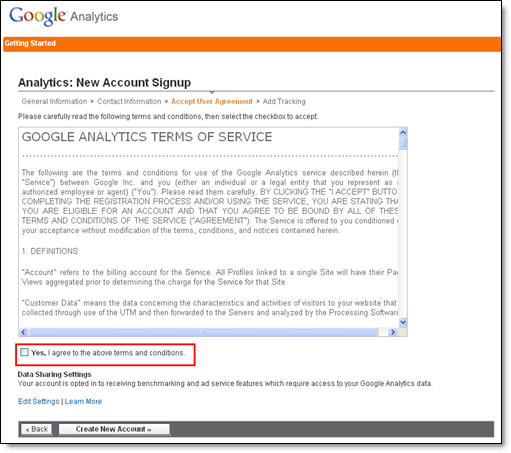
Google Analytics Blogger Step 4

Now this next screen is very important. This is the code you will need to copy and paste into your blogger template. Go ahead and click into the box and it will automatically highlight the entire block of code for you. Now you need to copy that code and paste it into notepad or into a MS Word document. Save it as you’ll need to use it later.
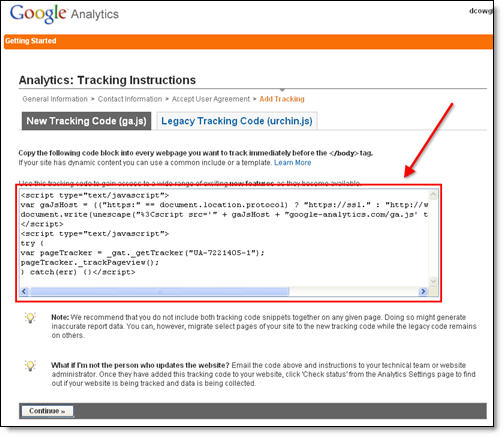
Google Analytics Blogger Step 5

After you click on the “continue >>” button you will be taken to your brand new Google Analytics dashboard! You will see your blogger blog listed but with no analytical data….yet.
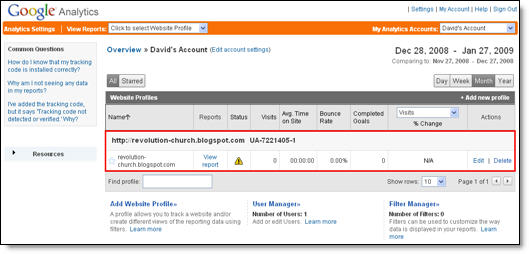
Google Analytics Blogger Dashboard

Ok, now you are done with setting up your Google Analytics account. The next step is placing the tracking code into your Blogger template so it can report back to Google Analytics and provide you with some cool data points.

Step #2 - Adding GA Tracking Code to Your Blogger Template

This is not a very difficult step even if you are afraid to touch your template code. Login to your Blogger account and then click on the “Layout” => “Edit HTML” tabs. This will bring you to the template code. Before you make any changes, I advice you to back up your template just in case there are any problems. After you’ve done so, continue reading.

Now in the edit template html code window, scroll all the way to the bottom of your template code and look for the tag. There should only be one of these closing tags in your template. If you can’t find it then your template wasn’t properly created and you should add one right above the tag.The tag should always be your last line of code in your template. It signifies the end of your template.

Ok, now go back to the code you saved before in a Word Doc from Google Analytics. You are going to copy it and paste it right above the tag as illustrated in the image below. The yellow highlighted code is the new GA code I just pasted into my template.
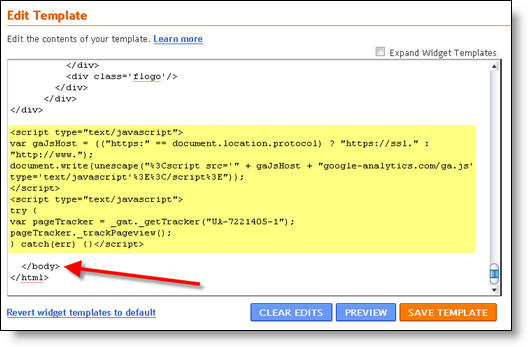
blogger google analytics code 2

Save your template and you shouldn’t get any error messages. If you do, it’s most likely not related to this GA code and something else with your template itself. Assuming you’ve been successful with your save, you are all done embedding the GA code in your template!

Step #3 - Confirm Google Analytics is Tracking

Go back into your Google Analytics account and look at your dashboard. Most likely you will see a little yellow exclamation mark under the “status” column that looks like this: google analytics tracking not installed. This means everything isn’t working properly yet which is fine because we are about to tell GA we just added the code. From your dashboard, click on the “edit” link which is located to the far right.
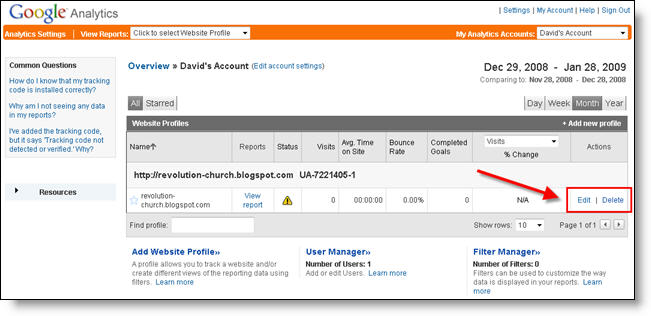
Google Analytics Blogger Dashboard Edit

After you click on that link, you’ll see another screen like below. It will say “Tracking Not Installed” followed by a link “Check Status”. You’ll want to go ahead and click on that link which will tell GA to visit your site and look for the new code you just pasted in your template.
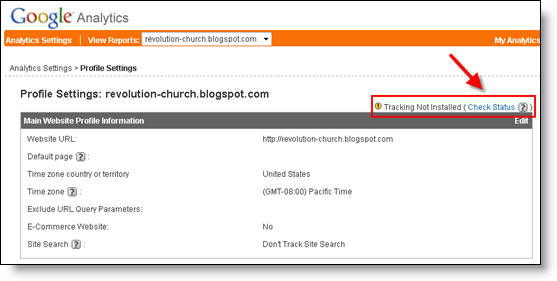
Google Analytics Blogger Dashboard Check Code

Assuming you pasted the code in there as instructed above, GA will find the new code and begin tracking everything on your blog. If you are still having problems, it’s most likely something to do with GA and you should read their help guide to troubleshoot your problem.

Google Analytics Blogger Dashboard Success

The message seen here, “Waiting for Data” means you have correctly setup GA and data is being gathered! Click on the top left Google Analytics logo and it will take you back to your dashboard. From there click on the “View report” link and that’s where all your very important Blogger visitor data will start appearing!
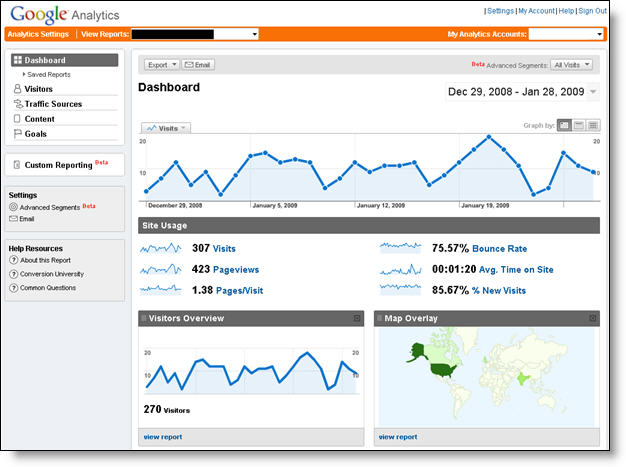
Google Analytics Blogger Dashboard Results

Now it usually takes an hour or so before you will see any data (maybe longer if you don’t get much traffic to your blog) so please be patient. Trust me, you’ll be logging in at least once a day just to see how much traffic your blog is getting. It’s very addicting and powerful information to learn from. You’ll be surprised which posts are your most popular and what countries people are coming from to read your blog.

Google Analytics is very powerful and we have just learned how to install it into your Blogger template. We haven’t even scratched the surface on the features and reporting it can do. For most Bloggers, this will be enough. Data will be collected and you will just review it. Others with more in-depth goals (like selling products or services, creating a sales funnel, etc) will want to spend more time learning GA. Hope you enjoyed the tutorial and don’t blame me for your new found addiction!



Followers


Copyright © 2009 by Video4Learn