
tbfm24n93z
Wednesday, July 22, 2009
Wednesday, July 15, 2009
Earn money from your ongoing traffic: Link Bucks

Earn money from your ongoing traffic:
As you know about the way most ad networks are working, and that type of websites are encouraged to annoy their honest regular visitors to participate and earn their money. Linkbucks comes with a new idea with a big change that by earn money by your outgoing web traffic . Now its a chnce for you to earn money by simply linking to the website, blog, forum etc you would anyway.
They paid twice a month with high rates:
Their strong relationships with top leading marketers enable them to pay rates above the industry standards. Also, unlike other ad companies that only pay out after few months, they send your money by paypal every two weeks.
I have been paid over 30 dollars on linkbuks site in one month. And all I am doing this by sitting back and let the dollars come in my paypal account. No doubt that this is a great free program to make easy online money with. I highly reccomend you If you are into blogging or online advertising you can definately make great money with this faster program.
This program is free to join for every one. So feel free to join this great program and start making money from today. Click here for signup.
Tuesday, July 14, 2009
Code Networks Announces Launch of Broadband Channel CODE.TV, the First Television Network for Affluent Urbanites
Code Networks is proud to announce the launch of CODE.TV, the first
television network for affluent 25-49 year olds, a free on-demand
broadband channel available exclusively at http://www.code.tv. CODE.TV
will launch on June 12, 2006, featuring local culture and lifestyle
programming for New York City and the Hamptons, with Los Angeles and
other city-specific channels to follow. CODE.TV gives viewers the
latest insider information from chic, hip, expert hosts who take them
inside the action and entertainment of each city's hottest and most
exclusive new destinations.
Each weekday CODE.TV will
release a new hosted video segment about the latest upscale New York
City and Hamptons hotspots, available for viewing free and on demand at
http://www.code.tv. CODE.TV programming gives its audience first-look,
exclusive insider information about all the spaces, places, and faces
the city will be buzzing about tomorrow. Users can meet the players,
take a tour, and get all the dish they need to keep abreast of the New
York and the Hamptons scenes; CODE.TV is there 24/7 to help
sophisticated urbanites separate the must-dos from the wannabes.
CODE.TV is the first outlet to bring the luxury urban lifestyle alive
with video and is advertiser-supported, with content that is strictly
editorial. CODE.TV's hosts and producers select and review all
destinations featured on the network.
Each CODE.TV segment
is hosted by an expert, from professional chef Sara Gore to full time
mother Wendy Fentress to avid athlete and outdoorsman George Oliphant.
The CODE.TV hosts bring the best of New York and the Hamptons to life
each day.
CODE.TV will capitalize on the explosive growth
of broadband video, reported by comScore as of March 2006 to reach more
than 77 million Americans each month, by harnessing the revolutionary
possibilities of broadband for distributing tailored TV to niche
audiences.
"We wanted to create something that has the
excitement and impact of television while satisfying every successful
young New Yorker's need to be ahead of the curve," said CODE.TV
executive producer Morgan Hertzan. "We are creating the ideal content
for broadband by focusing on the social currency of this young affluent
audience. We are the first to present urban luxury lifestyle editorial
as video, and now our audience can get to know these places, and the
people behind them, in a much deeper, more visual way."
Code Networks CEO Joseph Varet said, "CODE.TV was created to connect
with affluent Americans under the age of fifty, with all-original
programming that's uniquely relevant to them. This is arguably the
world's most desirable audience, yet they have never before had their
own TV network. For the first time, broadband technology allows us to
serve this incredibly valuable super-niche audience with high-quality
video programming. There are hundreds of magazines, websites, and email
newsletters where you can read about new luxury lifestyle destinations,
but it's far more compelling to experience them first-hand through our
entertaining and informative video profiles."
"CODE.TV is
a great example of how Internet TV is opening up the television market
with new channels and online media opportunities," said Jeremy Allaire,
Chairman and CEO of Brightcove, an Internet TV service dedicated to
harnessing the inherent power of the Internet to transform the
distribution and consumption of media. CODE.TV has partnered with
Brightcove, to distribute its broadband video programming. "We're
pleased to be working with the CODE.TV team, what they are creating
will fill a void in the current media landscape, and is the perfect
example of the possibilities of broadband TV. As former MTV Networks
executives, the CODE.TV team brings the market knowledge and scale
needed to make this a great success."
From Madison Avenue
to Mercer Street, the East Village to East Hampton, CODE.TV gives you
exclusive first-look access to the places that matter now. By merging
the omnipresence of the Internet with the exciting pace and style of
television, CODE.TV brings the young and affluent viewer the
information they want and care about.
About CODE.TV Founders:
Joseph Varet, CEO, was most recently responsible for all aspects of
business development and strategic planning for new television and
broadband networks at MTV. Among the channels that Joseph developed are
MTV World (a suite of subscription foreign-language music video
channels for bicultural US audiences) and a forthcoming
culture/lifestyle broadband network. Joseph also created and launched
the MTV Games videogame studio. Previously, Joseph was CEO of The
Groove Alliance, a publisher of branded online videogames for Disney,
Nickelodeon, Warner Bros, Microsoft, Mars, FedEx, Michelob, and others.
He has also worked in strategy and new venture development at Fox
Television and digital media agency KPE. A native New Yorker, Joseph
received a BA degree from Harvard College and a MBA from Columbia
Business School. Joseph serves on the Board of Directors of The
Northside Center for Child Development and the Contemporaries Executive
Committee of the Whitney Museum.
Morgan Hertzan, Chief
Creative Officer/Executive Producer, was most recently Executive
Producer for new television and broadband networks at MTV, where he
oversaw all aspects of creative development and production for MHD
(MTV's high definition music channel), MTV World, MTV Puerto Rico, and
MTV 44 1/2 (MTV's permanent video billboard in Time Square). Morgan
previously created, launched, and supervised production of mtvU (MTV's
college television network), which reaches over 7 million students at
700 US colleges and universities. Prior to joining MTV, Morgan was an
Associate Producer at CBS News' "60 Minutes." A native New Yorker,
Morgan received a BA in Broadcast Journalism from American University.
Morgan serves as Co-Chair of the Stephen D. Hassenfeld Center for
Children with Blood Disorders at NYU Medical Center.
Tuesday, July 7, 2009
How to Create Search Engine in Blogger
Now I will show how to create "Search Engine" in your blogger. This Search Engine is use to find articel in your blog, not to find articel at all website in the world. It's very easy, just follow the trick below you will have search engine in your blog. Here's the step:
1. Login to Blogger, Go to "Layout --> Page Elements". Klick "Add a page elements" then chose "HTML/Java Script".
2. Put the code below into "Content" Box
<form action="http://yourblogname.blogspot.com/search" method="get"> <input class="textinput" name="q" size="30" type="text"/> <input value="search" class="buttonsubmit" name="submit" type="submit"/></form>
Change yourblogname with your blog's name. The number "30" is width of your search engine, you can change it for appropriate to your layout.
GOOD LUCK!!!
Highlight Author Comment in Blogspot
This trick is to give a Highlight Author Comment . This will make the blog's owner comments looks different from the visitors comments. It's very usefull and interesting blogger hack tips. You can see the example in my blog. Here is what to do to make a "Highlight Author Comment" effect in Blogspot.
1. Login to blogger, then choose "Layout --> Edit HTML". Don't forget to backup your template first.
2. Check the "Expand Widget Templates" box.
3. Copy this script and put it before ]]></b:skin> or copy to your CSS area.
.comment-body-author {
background: #E6E6E6; /* Background color*/
color: #000; /* Text color*/
border-top: 1px dotted #223344;border-bottom: 1px dotted #223344;border-left: 1px dotted #223344;border-right: 1px dotted #223344;
margin:0;
padding:0 0 0 20px; /* Posotion*/
}
4. Then find this code:
<dl id='comments-block'>
<b:loop values='data:post.comments' var='comment'>
<dt class='comment-author' expr:id='"comment-" + data:comment.id'>
<a expr:name='"comment-" + data:comment.id'/>
<b:if cond='data:comment.authorUrl'>
<a expr:href='data:comment.authorUrl' rel='nofollow'><data:comment.author/></a>
<b:else/>
<data:comment.author/>
</b:if>
said...
</dt>
<b:if cond='data:comment.author == data:post.author'>
<dd class='comment-body-author'>
<p><data:comment.body/></p>
</dd>
<b:else/>
<dd class='comment-body'>
<b:if cond='data:comment.isDeleted'>
<span class='deleted-comment'><data:comment.body/></span>
<b:else/>
<p><data:comment.body/></p>
</b:if>
</dd>
</b:if>
<dd class='comment-footer'>
<span class='comment-timestamp'>
<a expr:href='"#comment-" + data:comment.id' title='comment permalink'>
<data:comment.timestamp/>
</a>
<b:include data='comment' name='commentDeleteIcon'/>
</span>
</dd>
</b:loop>
</dl>
5. The red color text is the code that you have to add to your script. The position must be right.
6. And then save your template.
* You have to login into your blogger account before to give comments.
HostingCon 2009 is Coming
For those of you who have been around the website hosting industry for at least the past few years, it is common knowledge that one of the industry’s most well-attended and prestigious conferences and trade shows is HostingCon. For those of you who are either newer to the industry, or who just haven’t had the opportunity to participate in HostingCon - this year’s event offers many reasons to consider attending.
I have personally participated as a speaker or panelist at every HostingCon event since its inception. I recall that last year’s panel on marketing featured none other that myself and another writer and industry marketing veteran from WebHostMagazine and WebHostBlog - Mr. David Dunlap.
A recent email notified me of my acceptance as a speaker at HostingCon 2009. Among the bits of information in the email sent from the HostingCon organizers was the fact that this year the group received over 120 speaker proposals. While the selection committee had difficulty narrowing the speaker field down, the remaining chosen speakers are noted to create an ”exceptional program with diverse and timely topics and actionable substance”.
But don’t take my admittedly biased opinion on HostingCon without some backup - here’s what a few other website hosting professionals had to say about HostingCon 2009.
Jeff Hardy, Vice President of Business Operations with SmarterTools, Inc. commented, ”SmarterTools has customers and technology partners in over one hundred countries. HostingCon is one of the few events that brings the industry together in a way that provides an opportunity to renew our network of industry professionals and meet new ones. Each year SmarterTools comes away from HostingCon with new ideas and perspectives that helps us drive to excellence in our host-friendly software and SaaS offerings.”
Daniel Foster is co-founder of UK web hosting firm 34SP.com and had these comments regarding HostingCon, ”We’re planning to attend HostingCon 2009 in Washington, D.C. to see what’s hot in the industry this year, what people are talking about and where their plans are taking them. We’re also looking forward to catching up with friends made at previous HostingCons and meeting new faces. There’s at least as much to be gained from the show floor and evening events as there is from the presentations given during the day.”
Takeshi Eto, V.P. Marketing and Business Development with ASP.NET hosting firm DiscountASP.NET adds, ”We attend every year because HostingCon is a great opportunity to network. Also, being a niched Windows hoster, we go to a lot of Microsoft events and it’s good to get exposure to what is going on with other areas of the hosting industry.”
Be sure to check out the full story at HostingCon.com. You can see the list of exhibitors, and soon you’ll have access to the complete list of speakers as well. I hope to see you in Washington, D.C. in August.
Sunday, June 28, 2009
Show Related Article to Your Post
The advantage of showing related article to your post is it will help your readers find more information related to the topics. This is base on label or category. This is usually put to the end of the article. After your visitors finish read your article, they will find some links that related to the post base on label or category.
Here's the tutorial to create "related article to your spot":1. Login to Blogger
2. Go to "Layout-->Edit HTML"
3. Click on "Expand Widgets Template" checkbox.
4. Then download THIS SCRIPT or HERE.
5. Open it then copy the scripts.
6. Paste the script after this code : <data:post.body/>. If you have "Read more widget" you will find two codes. Put it under the first code.
7. Save your template.
Good Luck...
Wednesday, June 24, 2009
Submitting Blogger Sitemap to Google Webmaster Tool
Submitting XML sitemap to Google Webmaster Tool is a part of SEO (Search Engine Optimization) initiative.
Submitting your sitemap to Google Webmaster Tool is not a must-do job. It won't directly affecting your site's SERPs,
but it helps Google crawler to comprehend your site's structure and "read" your contents more deep and accurate.
Submitting sitemap is like you give to Google crawler a sight. Without sitemap, what Google crawler do is just like blind man trying to guess what elephant's body shape is, only by touching it. He may only found elephant's trunk and say that elephant body is "long and thick". Or he only touching elephant's left ear and then conclude that elephant body is "thin and wide". He never really know the exact shape of the elephant.
Submitting Blogger sitemap is very easy. You don't even need to generate any sitemap. Just use your blog's Atom or RSS feed as sitemap. Login to your Google Webmaster Tool. On its main panel, choose blog you want to add a sitemap (if you have more than one). Click on Sitemaps Fill the blank textarea next your blog's URL with "Atom.xml" or RSS.xml" like this: Then click Submit Sitemaps
Once you submit your blog's Atom or RSS as sitemap, you can see its crawlability through Webmaster Tool Panel:
Note: Only latest 26 blog posts is cover on Blogger Atom or RSS feed. If you have more than 26 posts, earlier posts won't appear on that feed. Don't worry, those posts is still on Google index. You only can't track them through Webmaster Tool.
Why My AdSense Revenue is Very Low?
"Why my AdSense revenue is very low" is a common question among small AdSense publishers and bloggers. For those who confused and frustated, here is both good news and bad news: You are NOT alone.
Your problem with AdSense revenue is very common. Perhaps 90 percent (or more) AdSense publishers celebrating their first anniversary joining Google AdSense program with only few dimes in their account, embarrasing enough even just to buy a can of pet food. But you won't hear any AdSense publisher's failure story on the web, because everybody tend to keep their secret and let other people think prosperity and wealth always be with him :-D So don't blame yourself!
Looking at those sadness point, you may start thinking AdSense is useless, or even guessing someone at the Googleplex has doing conspiracy and stole your balance ...
No. There's no conspiracy, monkey business, or account balance stealing. Nothing wrong with AdSense program. AdSense is the best ad-network you can find on the web so far. It offer big buck reward for everyone who deserve to receive it. It's true that Google hide some detail fact and all internal data about AdSense program publisher want to know - and also strictly prohibit AdSense publisher to publish their own data.
However, we should regard Google goodwill to share part of their wealth with site's owners and bloggers. Those Big-G will not hurt their own reputation just to stole your petty cash. They've got their own revenue from advertisements on above and right side of Google search result. Huge enough to pay more than 20,000 employees and make Larry Page and Sergey Brin - duo Google co-founder - two of richest people in the world.
So now we should start seeking and breaking the problem in ourselves - and our sites. What wrong with our sites? Here is three key factors who build up your AdSense revenue:
1. Traffic, traffic, traffic
No traffic, no click. No click, no revenue. No need Albert Einstein to understand this very simple logic. Site or blog which have less than 1,000 visitors per day tend to have more difficulties to gain feasible revenue, since there's no much clicks-through on your ads.
The basic formula of Google AdSense revenue is:
AdSense Revenue = (Impressions * CTR * CPC)
Ad Impressions is depend on site's traffic. How to increase traffic to your site is not this article's scope and focus. Follow Allan Gardyne tips on his free PDF ebook 77 ways to increase website traffic.
If you feel increasing traffic is hard and time consuming process, ad impressions can also be increased by doing some on-site tweaking, such as adding "Related articles" section below your post that make visitors will spend longer time staying on your site if they found other interesting articles.
Other tip is divide your long article into multiple short posts. This trick will bait visitors to open all posts to finish reading entire article. More visitors spend their time on your site, more chance they will click on your ads. It's just similar to "to be continued" trick applied on every ending on popular TV series or soap opera.
2. Click-Through Ratio (CTR)
How much of your visitors who really turn to be ad-clickers? Click-Through Ratio (CTR) is a parameter to measure this - as it name suggest. The simple picture about CTR is, if you have 1,000 visitors and CTR of 2, it mean 2% of those 1,000 visitors (= 20 visitors) clicks on your ads. On the other word it means one of every 50 visitors will be ad-clickers. CTR is important because a rise of 0.1 in CTR will increase your revenue as much as 10%.
So now you have a picture why 1,000 visitors (or impressions) per day is normal target to generate feasible AdSense revenue. If your site has only 20 visitors per day and CTR under 1, you will spending your entire life counting time until the next five cents-worth click happen ..
CTR is vary and highly influenced by on-page factors including ad placement, ad color, and ad unit style. If daily traffic amount is not your problem anymore, then you should give more attention to these factors. Official AdSense Publisher's Optimization Tips will help us by give any useful tips, such as blending ads with content (but not to make your visitors confuse to differentiate between content and AdSense ads), choosing best ad unit, best ad placement etc. Follow their guidelines and combine it with your own improvisation.
3. Cost-per-Click (CPC)
AdSense ads price are not created equal. Its worth based on Google AdWord dynamic bidding mechanism. Ads price has wide range from few cents to several dollars per click. We - as publisher - have a portion of this value. How much exactly no one knows. Except we are VIP or one of those big publishers with special contract, we have no power to insist Google to reveal their payment scheme.
However, we still can determine which keywords have high CPC by using Google AdWord Keyword Tool External to get rough estimation about how much you'll be paid if you optimizing your page using those keyword(s).
But always keep in mind, don't go too far with high paying keywords. You shouldn't 'prostitute' your site or blog solely to chase dollars from high paying keywords. Don't write about mesothelioma prognosis if you are not expert on this medical field, just because mesothelioma is one of most prosperous AdSense keyword. It can mislead people who seriousy seeking for those crucial medical information, and also can be black-listed as web spammer. Once your site identified as spam site, Google will penalize it from their index with no mercy at all.
Internet is full of junk, so don't throw up more dirts on it. If you're blogger, keep the purpose and reason of our blogging activity is because we enjoy it and want to enhance other people's experience. Treat AdSense just as candy reward because we provide best content for people - not as goal or motive that makes we start blogging. When we focus on quality and worthful content - and always make it up-to-date by adding new contents regularly, then traffic will automatically increase by the time. Both direct and via search engine. So do your AdSense revenue ..
Embedding Adsense Ads Within Blogger Post Body
Many AdSense publishers believe that embed AdSense ad inline or within post body will significantly increase CTR (Click Through Rate) - so the revenue. I agree with them, based on my own experience. Logically, ad within post body tend to have higher attention from visitors and decreasing what so called ad-blindness. You can see my medium-rectangle AdSense ad unit standing on right side of this text, blended with entire post.
If you have Blogger blog and want to put your AdSense ad on your post body just like mine, steps you should do is bloody easy to learn. First, generate AdSense code. I suggest you generate suitable ad unit like large-rectangle (336x280) or medium-rectangle (300x250) - depend on your main column width:
Next, parse your AdSense code. You cannot embed those code directly into your blog template without parsing it before by replacing some elements on those code. Don't worry, it won't infringe Google AdSense TOS because parsing is NOT an attempt to change the code. It only change the way computer interpret your code - not altering it. Basically parsed code is exactly same as original - before it parsed.
Replace three elements on those code as mention below: You don't have to replace it manually, one by one. Don't bother yourself! Use simple text editor like Notepad. Open Notepad, then click on Edit menu --> Replace. Replace window will come up. Fill in character you want to replace on Find What: input, and new character on Replace With: input, then click on Replace All button:
Those parsed code then should embed on your blog template. Open your Blogger HTML template editor, then click on "Expand widget template". Find this code on your Blogger HTML template:
If you want your Adsense ad appear on inline-above side of you post (like mine), put your AdSense code right above data:post.body code:

Don't forget to wrap your AdSense code between to ensure your AdSense code blending perfectly with Blogger template. If you want your ad take a position on left side, just replace wrapper code div style='float: right;' with div style='float: left;'.
Additionally, if you want your AdSense ad appear below your post, put it right below
Sunday, June 14, 2009
How to Install Google Analytics on Blogger
Wouldn’t it be nice to know how many people actually visited your blog each day? How about knowing which of your posts are the most popular? Well surprisingly Blogger doesn’t currently offer any native blog analytics but fortunately there is Google Analytics — available for free.![]()
Google Analytics is a great tool that will show you all sorts of useful information about how people found your blog, keywords they searched on to find you, where they came from and even how long they stayed. You’ll learn more about where your visitors come from and how they interact with your blog. This is a must tool if you are trying to build a profitable blog otherwise you are flying blind!
This article will show you how to add Google Analytics to your Blogger blog. It’s a fairly simple process and doesn’t require any technical skill at all.
Step #1 - Setup a Google Analytics Account
Go to Google Analytics and sign in using your Blogger login. If your account doesn’t work for some reason, you can create a new one instead. Once you login you’ll see a screen that looks like this:

Click on the “Sign Up >>” button and proceed to the next step which will ask you for your general information. Website URL, Account Name, Country, and Time Zone. The screen will look like this:
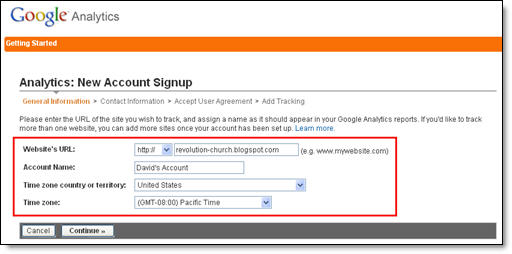
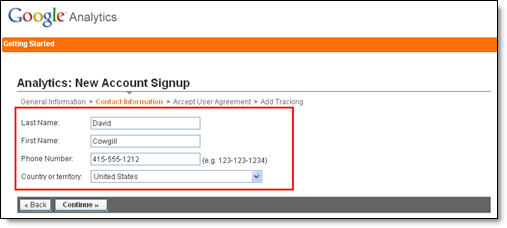
If you noticed, I just put my Blogger url (without the http://) and called it “David’s Account” because this is your top-level container for 1 or 100 different websites so it’s a good idea to name it something more general. The next step will ask you for your contact information which includes your first name, last name, phone number, and country. Easy so far right? ![]()
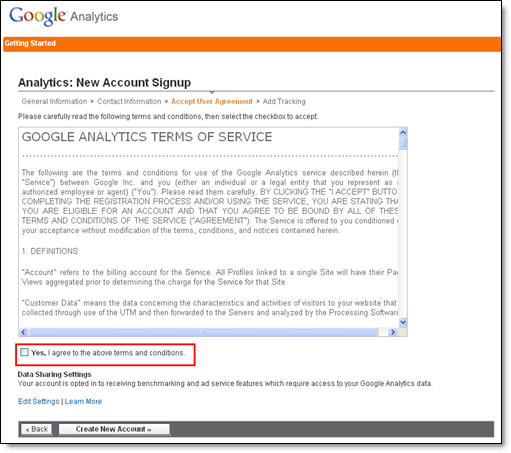
Your last step in signing up will ask you to accept the user agreement terms and conditions which you should read (just kidding…who actually ever reads these entire legal terms anyhow?).
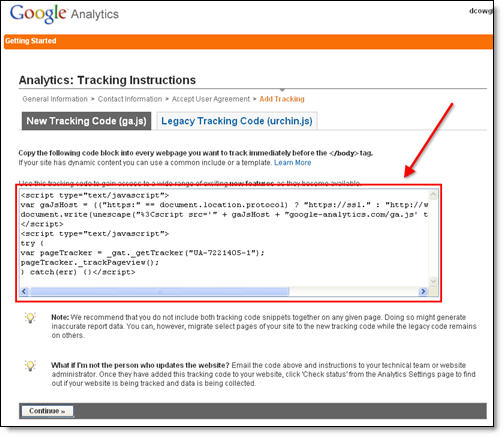
Now this next screen is very important. This is the code you will need to copy and paste into your blogger template. Go ahead and click into the box and it will automatically highlight the entire block of code for you. Now you need to copy that code and paste it into notepad or into a MS Word document. Save it as you’ll need to use it later.
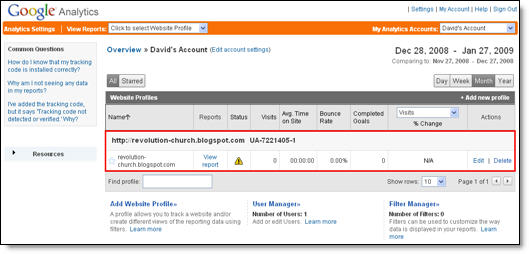
After you click on the “continue >>” button you will be taken to your brand new Google Analytics dashboard! You will see your blogger blog listed but with no analytical data….yet.
Ok, now you are done with setting up your Google Analytics account. The next step is placing the tracking code into your Blogger template so it can report back to Google Analytics and provide you with some cool data points.
Step #2 - Adding GA Tracking Code to Your Blogger Template
This is not a very difficult step even if you are afraid to touch your template code. Login to your Blogger account and then click on the “Layout” => “Edit HTML” tabs. This will bring you to the template code. Before you make any changes, I advice you to back up your template just in case there are any problems. After you’ve done so, continue reading.
Now in the edit template html code window, scroll all the way to the bottom of your template code and look for the tag. There should only be one of these closing tags in your template. If you can’t find it then your template wasn’t properly created and you should add one right above the tag.The tag should always be your last line of code in your template. It signifies the end of your template.
Ok, now go back to the code you saved before in a Word Doc from Google Analytics. You are going to copy it and paste it right above the tag as illustrated in the image below. The yellow highlighted code is the new GA code I just pasted into my template.

Save your template and you shouldn’t get any error messages. If you do, it’s most likely not related to this GA code and something else with your template itself. Assuming you’ve been successful with your save, you are all done embedding the GA code in your template!
Step #3 - Confirm Google Analytics is Tracking
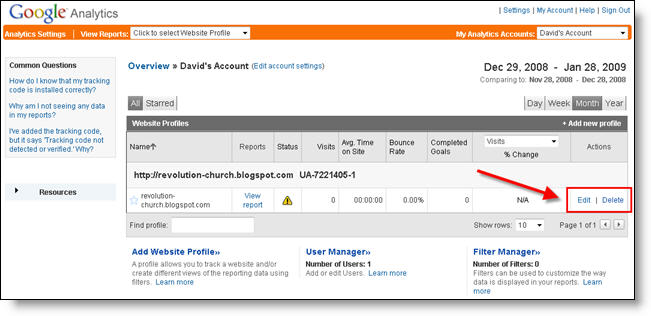
Go back into your Google Analytics account and look at your dashboard. Most likely you will see a little yellow exclamation mark under the “status” column that looks like this: ![]() . This means everything isn’t working properly yet which is fine because we are about to tell GA we just added the code. From your dashboard, click on the “edit” link which is located to the far right.
. This means everything isn’t working properly yet which is fine because we are about to tell GA we just added the code. From your dashboard, click on the “edit” link which is located to the far right.
After you click on that link, you’ll see another screen like below. It will say “Tracking Not Installed” followed by a link “Check Status”. You’ll want to go ahead and click on that link which will tell GA to visit your site and look for the new code you just pasted in your template.
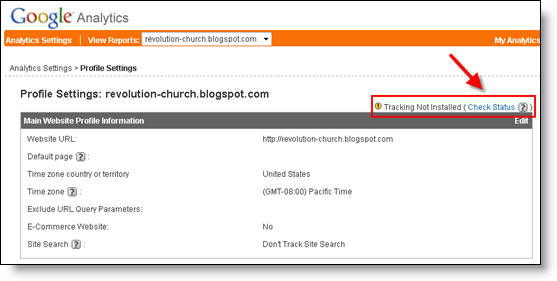
Assuming you pasted the code in there as instructed above, GA will find the new code and begin tracking everything on your blog. If you are still having problems, it’s most likely something to do with GA and you should read their help guide to troubleshoot your problem.

The message seen here, “Waiting for Data” means you have correctly setup GA and data is being gathered! Click on the top left Google Analytics logo and it will take you back to your dashboard. From there click on the “View report” link and that’s where all your very important Blogger visitor data will start appearing!
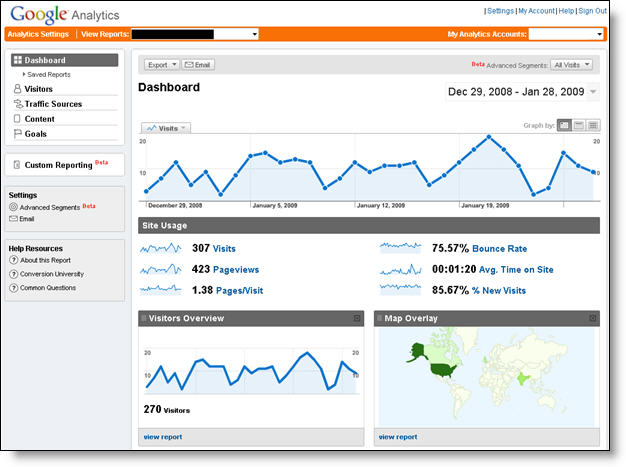
Now it usually takes an hour or so before you will see any data (maybe longer if you don’t get much traffic to your blog) so please be patient. Trust me, you’ll be logging in at least once a day just to see how much traffic your blog is getting. It’s very addicting and powerful information to learn from. You’ll be surprised which posts are your most popular and what countries people are coming from to read your blog.
Google Analytics is very powerful and we have just learned how to install it into your Blogger template. We haven’t even scratched the surface on the features and reporting it can do. For most Bloggers, this will be enough. Data will be collected and you will just review it. Others with more in-depth goals (like selling products or services, creating a sales funnel, etc) will want to spend more time learning GA. Hope you enjoyed the tutorial and don’t blame me for your new found addiction!
Monday, May 25, 2009
How to Setup FeedBurner on Blogger
Blogger is a great blogging platform which almost anybody can use. If you already have a Google account, it’s easy to setup (if not you just need one) and start blogging within minutes. The downside of using Blogger is the lack of built in features that are in my opinion essential to have. I’m going to share with you some of my favorite free Blogger add-ons that I highly recommend using. The first of the bunch being FeedBurner
Step #1 - Setup a FeedBurner Account
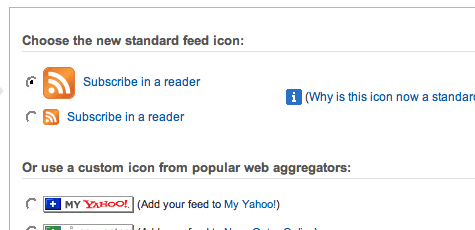
FeedBurner’s free rss service (now owned by Google) is very powerful. It allows you to place an rss image like the ones you see below on your blog so your readers can easily subscribe to your blog content. FeedBurner also offers a way for your readers to subscribe by email so everytime you post, an email will automatically get sent to them. Other features include seeing how many blog subscribers you have , which posts are most popular, as well as many other rss feed statistics. You’ve probably seen images like these on websites and especially blogs. This is what they are using. ![]()
![]() Create your free account now.
Create your free account now.
Step #2 - Create Your Feed
The main piece of information you’ll need when setting up your FeedBurner account is your original blog feed url. All blogs automatically come installed with a feed but nothing is really done with it. That’s where the magic of FeedBurner comes in. Your feed url will look something like this:
http://yourblognamehere.blogspot.com/feeds/posts/defaulthttp://yourblognamehere.blogger.com/feeds/posts/default
Feedburner offers auto discover so you don’t even need to figure out your feed url. Just enter your Blogger url right on their home page and it will automatically discover your feed. If you have more than one blog, it will list them all so select the blog you’d like to setup.

For bonus points and just for fun, paste the url into your internet explorer browser and watch what comes up. It’s basically the raw text and images from your blog posts. Pretty neat huh?
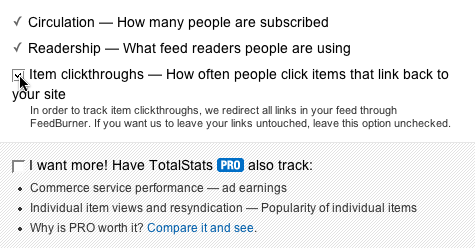
Follow the rest of the setup wizard and you’ll eventually come to the configuration page. Here’s where you want to select the extra features like “track item clickthroughs” and also check the “FeedBurner Pro” box. They used to charge $4.95 a month extra for this service but ever since Google acquired them, they offer these extra features for free. Why not take advantage of it?
Click the Next » button to finish the setup process and enter the feed management interface. Now you’re now ready to make your FeedBurner feed available on your Blogger site!
Step #3 - Point Your Blogger Feed to FeedBurner
Once you setup an account on FeedBurner, you’ll need to make sure all feed traffic for your blog content goes to your FeedBurner feed. This helps make sure your FeedBurner stats are more accurate and even any existing subscribers to your ‘Original Feed’ are routed through FeedBurner.
-The first step is to get the url of the new feed you just created. When you setup your Feedburner account, it asked you for a name of your first feed. For example, our feed on eBlog Templates looks like this:
http://feeds.feedburner.com/eblogtemplates
Here’s the screen where you’ll find your new feed:
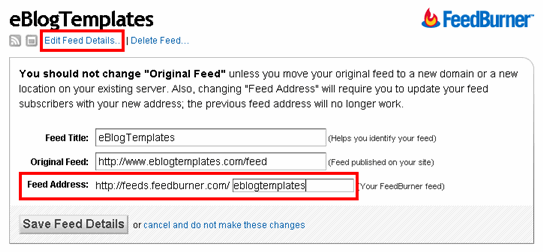
Once you click on the “edit feed details”, you’ll see this screen. Notice what I highlighted in red? That’s the feed url you need to copy and save.
-Now you’re going to log into your Blogger account and head on over to the “Settings” => “Site Feed” tab.
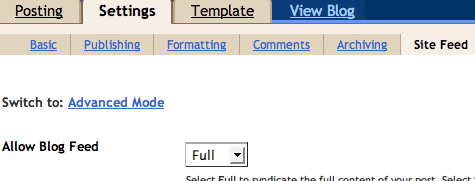
Scroll down until you find the “Post Feed Redirect URL” text box and enter the FeedBurner feed url you wrote down earlier. It will look something like this:
http://feeds.feedburner.com/eblogtemplates
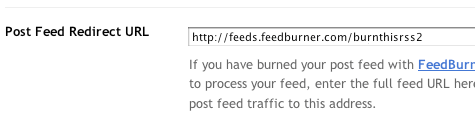
Make sure you type in your entire feed address including the “http://” portion otherwise you’ll have problems later. Click the “Save Settings” button and you should see the message “Settings were Saved Successfully”. Now Blogger will redirect all feed traffic for your blog to your FeedBurner feed which is exactly what we want!
Step #4 - Promote Your FeedBurner Feed on Your Blog
So now that everything is wired up properly we just need to promote it using one of those cool rss buttons on our blog. FeedBurner calls these icons chicklets (cute huh) so that’s what we’ll call it. Switch back over to your FeedBurner account and click on the “Publicize” tab.

Then on the left side find and click on “chicklet chooser” and select one of the icons which will end up on your blog.
Then scroll down to the bottom of the page and click on the drop-down. You’ll want to select “Blogger” to add the chicklet as a widget to your blog.

After you click the “Go!” button, Blogger will open in a new window and you’ll need to follow the prompts to continue to add the new widget.

Once you click on “Add Widget”, it will take you to your Blogger page elements layout where you can arrange the new FeedBurner widget. Save your layout and you’re done! You should now have a cool-looking rss feed icon on your blog where anyone can easily subscribe to your blog. Remember to login to FeedBurner often to check out your stats. You can accurately see the number of subscribers and also get a good idea of what people are reading. It helps you decide the types of things to write about in the future!
Bonus Step - Setting Up the Subscribe Via Email Option
At this point you might just be happy with the rss FeedBurner widget but I’d recommend also giving your readers the option to subscribe via email as well. Not everyone uses rss and email is much more familiar to everyone so why not give them both options?
By default, the email option is not turned on within FeedBurner so let’s go switch it on now. Navigate over to your “Publicize” tab and then click on “Email Subscriptions”. Here you’ll scroll all the way down to the bottom and then click the “activate” button to turn it on.
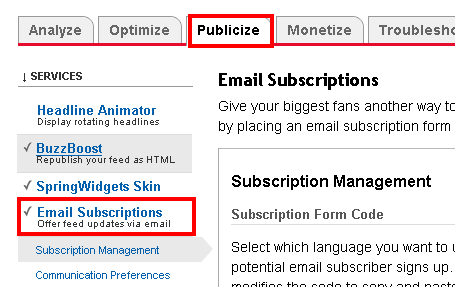
This step didn’t add anything to your blog it just turned on the feature so you are able to use the email subscriptions option. Next, you’ll need to copy the email box code and paste it somewhere on your site. You can also use the handy Blogger widget generator which will save you the hassle of mucking with your template code, but most newer templates that you download require you to tweak the template code itself.
Now that you’ve got the basics setup, I recommend spending some additional time browsing around FeedBurner’s interface because there’s lots of other cool options for you to configure. The best things in life are always free.
Web Host Manager Administration Guide

Web Host Manager Administration Guide
If you are running a web host or web space reseller then the chances are you'll be using WebHost Manager. This book shows you how to get the most from the software, for both you and your customers. It provides solutions to common WHM problems and pitfalls, leading to better customer service provided at lower cost. You will learn how to set up WHM securely, offer a variety of account styles.
If you are running a web host or web space reseller then the chances are you'll be using WebHost Manager. This book shows you how to get the most from the software, for both you and your customers. It provides solutions to common WHM problems and pitfalls, leading to better customer service provided at lower cost. You will learn how to set up WHM securely, offer a variety of account styles.
You will see how to use WHM to elegantly manage multiple domains, SSL certificates, and various databases and server-side technologies such as PHP, MySQL, Perl, and Apache. WebHost Manager is a package used by web hosts to manage their servers and the individual user accounts they hold. It is part of the same package as cPanel, so the host uses WebHost Manager while the client uses cPanel. WebHost Manager is at the core of many web hosts' business. Using web host manager, you can keep track of the accounts on your server, monitor their bandwidth and disk space usage, and much more. The book shows you how to: - Set up a fast, secure, and effective server with WHM - Work with Apache, PHP, Perl and Databases - Manage standard and reseller accounts and use third-party programs that assist in this process - Keep an eye on what is happening on your server by using tools that WHM provides and some third-party tools - Deal with reseller and non-reseller accounts - Manage DNS, IP and SSL issues using WHM - Manage security on an on-going basis by learning what to look for - Learn how to add useful features to WHM and cPanel - Discover places you can turn to for help if you need it
top 10 Web Host
web Hosting Choice is a free research guide to help users choose the right web host for their personal or business website. Our focus is on providing a simple, easy to follow site to help users choose the best web hosting plan most suitable for a small site or for a large e-commerce website. The web hosting sites, which were rated highest in the industry, are listed below and are rated based on affordability, reliability, uptime and tech support. Best 10 Web Hosting Sites Last Updated 04/26/09
Rank Web HostPrice Score Setup Domain Disk Space Data Transfer Money
BackHosting Review 1![]() Visit Host$3.95
Visit Host$3.95100% FreeFreeUnlimitedUnlimitedAnytime Voted Best Host
Read Review 2 ![]() Visit Host$3.95
Visit Host$3.9598% FreeFreeUnlimitedUnlimited30 Days Fastest Growing
Read Review 3![]() Visit Host$4.83
Visit Host$4.8397% Free FreeUnlimitedUnlimitedAnytime Speedy Support
Read Review 4![]() Visit Host$6.95
Visit Host$6.9596% Free FreeUnlimitedUnlimited90 Days Top Biz Host
Read Review 5![]() Visit Host$3.95
Visit Host$3.9595% Free FreeUnlimitedUnlimited30 Days Best Support
Read Review 6![]() Visit Host$4.95
Visit Host$4.9595% Free FreeUnlimitedUnlimited30 Days Green Hosting
Read Review 7![]() Visit Host$6.95
Visit Host$6.9593% Free $15UnlimitedUnlimited45 Days Pay Monthly
Read Review 8![]() Visit Host$9.95
Visit Host$9.9592% Free Free250gb2500gb30 Days Top Variety
Read Review 9![]() Visit Host$6.29
Visit Host$6.2991% Free $10150gb150gb30 Days Largest Host
Read Review 10![]() Visit Host$12.95
Visit Host$12.9589% Free FreeUnlimitedUnlimited30 Days Trusted Yahoo!
Read Review
Subscribe to:
Posts (Atom)

